|
[Front Page] [Features] [Departments] [SGAP Home Page] [Subscribe]

Getting Started 5: Potting On
Based on a series of short article aimed at the new grower of Australian native plants. The original series was written by the late Arthur Cooper and appeared in the newsletter "Native Plants for New South Wales" in the early 1970s. It was subsequently updated and reprinted in the same newsletter in 1990-91.
The time will come when you must shift your plants into larger pots. This time is:-
- When cuttings have produced significant roots.
- When seedlings have produced their first "real" leaves.
- In established plants, before the pot starts to confine the roots.
 |
Well established roots on a batch of cuttings in a community pot.
Select the thumbnail image or the highlighted phrase for a higher resolution image (24k).
|
Potting-on is essential, but it can cause damage to the roots which will retard the growth of the plants, or even kill them, if not carried out carefully.
The roots we are talking about are the "feeding roots" which are delicate and invisible "fur" on the surface of the visible roots. Grains of soil are so firmly fastened to these roots that they cannot be got away without killing the them.
Hence it's wise to transplant not just the plant but the whole potful of soil (the "root ball"), with as little disturbance as possible. Moisten the soil in the pot and leave it for an hour or two to get it damp right through so that it will hold its shape. Take your new pot (clean, of course) and loosely fill it with your potting mixture. This should be of open texture so that it won't get solid after watering and will drain well. But, bear in mind the subsequent life of the plant...if you're going to plant it into a heavy-soil garden, you must use a rather heavier potting mixture than if you're going to plant it into a sandy garden.
Potting mixes that have been used successfully include a coarse river sand/peat moss mix in the ratio of 3:2 and a mix of coarse river sand/peat moss/sandy loam in the ratio of 5:4:3. A useful reference on this topic is the CSIRO's publication "Potting Mixes", which is No.9 in the series "Discovering Soils".
Now that you have you new pot with its potting mix, take a pot similar to the one that your plant is in and place it in the mix in the new pot and firm the mix around it. You should now have an impression roughly the size of the root ball of the plant you wish to transplant.
From thin sheet metal (such as old can) make a scoop which will fit around half your present pot; tap the pot to loosen the plant and slide the plant and earth complete into the scoop; slip the scoop into the hole in the new pot and slide the plant and its earth into the hole. Sprinkle some potting soil into any gap around the plant and gently firm it down. A light watering and you've done the job without handling the ball of earth, with the attendant risk of squeezing and crushing the roots.
If you can't pot on in this way (if, for instance, you have several plants in a small pot and you want to pot them on singly) loosen the plant or plants from the soil very carefully; protecting the roots from damage is more important than cleaning off the soil. Don't rub the soil off; don't even wash it off. Make a hole in the soil in your new pot, big enough to accommodate the roots when splayed out a bit, and lower the plant into the hole with one hand. Use the fingers of the other hand to collapse the soil into the hole around the roots. Add more soil until it's the same level up the stem as it was before transplanting (do this whenever you transplant!). Lightly water.
 |
Carefully separate established cuttings to minimize root damage. Select the thumbnail image or the highlighted phrase for a higher resolution image [26k].
|
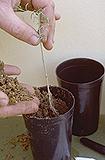 |
Fill potting mix gently around the fragile root system.
Select the thumbnail image or the highlighted phrase for a higher resolution image (22k).
|
If you leave potting on until too late, the roots of the plant will have formed a spiralled mass in the pot. It's no use planting the plant like that; those roots will remain spiralled and will strangle the plant. It's also not much use trying to spread out the wound-up roots. It's usually best to admit that these roots are doing no good and to cut them off. You can reduce the risk of root-spiralling by using deep pots; whether they are tapered or parallel sides probably doesn't really matter.
Potting-on is a shock to your plants. Help them to overcome it by keeping them for a few days in the environment in which they lived before potting-on. This is called "hardening-off". Keep the plants damp (not wet) for their roots will have difficulty in keeping up with their water demand.
Modern slow-release fertilisers are reducing the old risks of death after potting-on. Osmocote or Nutricote at the recommended rates are giving excellent results. But don't administer them too generously.

[Front Page] [Features] [Departments] [SGAP Home Page] [Subscribe]
Australian Plants online - June 1999
Association of Societies for Growing Australian Plants
|