Acacia Seed Raising
Ron Nicholson
This is how I tackle Acacia seeds germination, perhaps worth a try if anyone is not completely satisfied with their current method. I wish to add that this article was requested, not offered as I don't feel competent or experienced enough to tell anybody how to raise seedlings. For known fresh seeds, I obtain close to 100% success. Old seeds from the seed bank is what this is about, and how I went about their germination follows.
The method I use and have used now for about five years varies a bit from other recent published methods. My results are consistently good and as such, I have no reason to change. I use it for seeds as fine as eucalypts. I am a novice gardener, only having taken up the challenge since retiring.
My impatience was the motivator for the method (not knowing what was happening), coupled with my very limited success when seeds were sown conventionally. This is mainly due to my inability to judge and maintain the correct moisture requirements for germination for the particular seeds in question, or the vagaries of the rule of thumb method for planting depth.
I have observed considerable differences in the thickness of Acacia seed coats even within the same seed pod. This fact can be seen by the number of seeds that germinate but cannot fight their way out of the seed coat using my method. For commercial purposes hot water is the cheapest and easiest method - they are unconcerned if a number of seeds are rendered unviable due to excess heat.
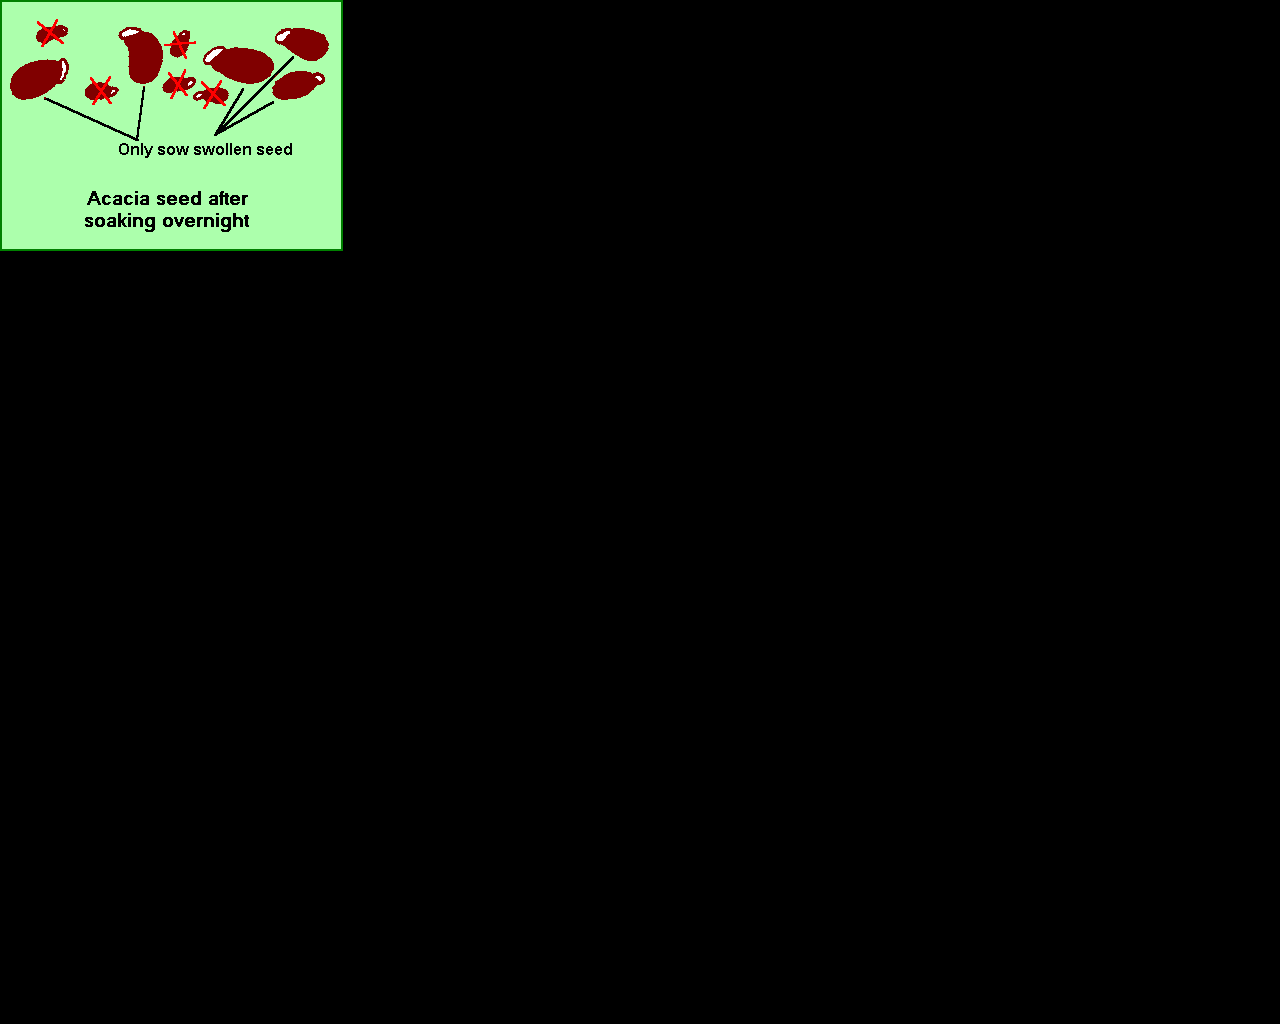
The first step is the removal of the floaters (Ed. seed that floats when placed in a container of water - this seed is probably not viable). I then use a fine three-cornered saw sharpening file to abrade the seed coat opposite the embryo. The seed is soaked in cold water for 24 hours. All seeds in this batch swelled.
Swollen seeds are then placed on moist cotton make-up removing pads ('Dove' brand, presumed sterile), not covered and placed in an air tight compartmentalised lidded plastic box (each section containing one seed type only). These boxes are then placed under a black plastic container excluding light completely. Seeds are inspected daily for germination.
Germination for me is when the radical shows through the seed coat. Upon germination, I immediately (same day) transfer them into square 4 x 4 x 6.5 mm black plastic pots in a styrofoam tray using my own brew of potting mix.
The process is aborted if no germination has occurred in two weeks from the time the seed plumped up. If some have germinated, I would only persevere with those that didn't for a further three days. My reasoning right or wrong for this time frame is, in my case, I am looking for vigour in the plant and I feel if it starts life with somewhat tardy germination (all seeds are in the same environment), it's not worth my time coaxing it along.
Planting mix for me is important. I have consistently better results using a brew based on compost in comparison to a purchased sterile potting mix, with the addition of fertiliser. The compost I use has evolved from as much diversity of materials as is available at the time. All materials go through a shredder at least once, or depending on the material, as many times as required to get plenty of surface area.
In respect of compost, I have better results in making it as a 'one-off'. I do not add to the heap as material becomes available. I also prefer to make the heap in the open using a ring of sheep wire lined with small chicken mesh. I turn the heap usually three times in three weeks.
By then, the heap has started decomposition and the heat is down to only warm. After six months, the heap is passed through a 1/4 inch sieve and made evenly moist, then transferred to a lidded 200 litre drum. This is then given a further six months to stabilise, lifting the lid at monthly intervals for a day for some fresh air to circulate.
On mixing the brew for the seedlings, it is made moist and kept moist for the minimum of one month prior to use. This, for me, provides good moisture retention and fairly even moisture distribution when the plants required watering. The pH is, if necessary adjusted to 6.5 using lime or veterinary sulphur (it's cheaper).
My Acacia potting mix consists of one part compost, one part aged hard wood sawdust, one part aged shredded pine bark, and one part soil. Aged in this case is a minimum of 12 months spread out in the elements and watered if it looks like drying out.
Soil used for acacias is from around a variety of plants that have produced nitrogen nodules including the roots with nodules adhering.
In all instances of planting out acacias, the best performers have been those that have already set nitrogen nodules in the pot. I am still looking for the right bacteria to set this in motion for all the Acacia seeds acquired. The property being planted and the area around it has no indigenous acacias and I am presuming the lack of performance is related to the absence of the right bacteria. I bulk at the idea of giving them fertiliser. I prefer to let nature be the provider.
The potted plants are placed in a waterproof shade structure giving 70% shade with orientation allowing two hours of unshaded morning and afternoon sun when day temperatures are below 30 degrees C, afternoon sun is shaded when temperature exceeds 30 degrees C. This is achieved by adjusting the heights of two shade cloth blinds. The design of the structure allows plenty of air circulation. The area is protected from strong wind.
This sounds elaborate but it is only a man-made structure trying to duplicate the conditions self-sown seedlings experience growing under native trees.
Plants are potted up as required using the same mix with the exception of the loam which is replaced by an active loam taken from the vegetable garden. This may have on occasions received blood and bone fertiliser. No additional fertiliser is used at any stage in the potting mix.
I pay particular attention to ensure the young plants do not become pot bound. This can mean potting up four or five times before planting out.
All plants I consider not performing to expectation are ruthlessly culled. This, I feel pays dividends with survival when in the ground. My losses are mainly due to frost averaging 30 a year, occasionally going down to -8° C, and wildlife damage.
I am not living on the property being planted and want the plants as sturdy as possible before planting into a somewhat, by comparison, neglected environment.
References to water in the preceedings in all cases refers to rain water, not reticulated treated water, cos I'm a "bushy".
From the newsletter of the Acacia Study Group, August 2002.
Australian Plants online - 2006
Association of Societies for Growing Australian Plants
|