|
[Front Page] [Features] [Departments] [SGAP Home Page] [Subscribe]

Getting Started 3: Growing from Seed
Based on a series of short articles aimed at the new grower of Australian native plants. The original series was written by the late Arthur Cooper and appeared in the newsletter "Native Plants for New South Wales" in the early 1970s. It was subsequently updated and reprinted in the same newsletter in 1990-91.
Many Australian native plants can be grown readily from seed. Propagation by this means has advantages over propagation by means of cuttings...and vice versa. For instance, you may be able to obtain seed when you cannot obtain cutting material; seed normally does not have to be planted immediately and it requires no special equipment of any kind.
Containers
Seed may be sown in punnets, pots or shallow fruit boxes. 75 mm. depth of seed raising mix is sufficient. If using shallow boxes, you can sow several different sorts of seed in the one box. Divide it up with narrow strips of wood or plastic or other suitable material. Large seeds such as Waratah, Hakea, Grevillea, Acacia and others can also be sown in small individual pots. This eliminates the necessity for "pricking out", which we will be talking about later.
All containers must be well drained. Be sure to label seeds carefully.
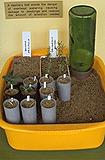 |
Suitable containers for sowing seed include tubes and punnets. Here the seed raising mix is kept moist by a capillary bed.
Select the thumbnail image or highlighted name for a higher resolution image (28k).
|
Sowing Medium
Any loose textured fine loam is suitable. If your soil is too heavy, mix coarse sand with it. Commercial seed raising mixtures are also suitable as is a mixture of about 40% peat moss and 60 % coarse sand.
Sowing the seed
Before sowing, the seed raising mix must be watered to ensure that it is quite wet but not soggy. Fine, light seed such as Melaleuca, Leptospermum, Callistemon, Isotoma, Ozothamnus, Bracteata, etc. should be scattered over the surface of the soil and then covered with a sprinkling of the sowing medium. Twice the thickness of the seed is sufficient. The container must then be watered with a very fine spray to avoid disturbing the seed.
Larger seed such as Grevillea, Hakea, Eucalyptus, Allocasuarina, etc. should be well spaced out in the container so that seedlings can be easily handled later on. Place the seed horizontally on top of the mix and press it gently so that only the upper surface is visible. Then cover with soil twice the thickness of the seed.
Seed which requires treatment before sowing. Seed in this category have a tough testa (or woody outer layer) which prevents water from penetrating and commencing the process of germination. Many of them will respond to one of the two methods described here.
Treatment by abrasion and soaking - Seeds of Acacia, Cassia, Aotus, Bossiaea, Chorizema, Swainsona, Pultenaea, Kennedia (in fact all of the "pea" family) require soaking and often abrasion as well. If the seed is large enough to hold in the fingers, saw at it gently (and carefully!) with a razor-blade or file. Do not cut right through the testa or you may damage the embryo inside. When the seed is too small to handle in this manner, place it on a sheet of fine sandpaper and rub it gently with another sheet. Do this carefully otherwise the seeds will shoot all over the place. Then place the seeds in a cup or small container and pour nearly boiling water over it.
In about 12 hours many of the seeds will be noticeably swollen. These are ready for sowing. Repeat the sawing and soaking process on the others; do not sow until they have swollen. Then follow the procedure recommended for the larger seeds above, sowing either in individual pots or in the larger containers.
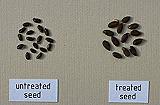 |
Acacia seeds swell noticeably (left) when they are ready to sow.
Select the thumbnail image or plant name for a higher resolution image (34k).
|
Note that sometimes abrasion is not required and the seed will swell following soaking alone. You will need to experiment to determine those that need abrasion as well as soaking.
Treatment by burning - Seeds in this category are those of plants which come up in their thousands after a bushfire, and are otherwise seldom seen as small seedlings. They are often difficult to germinate but may respond to a "simulated bushfire", but there are no guarantees. The group includes Boronia, Eriostemon, Ziera, Leucopogon, Ricinocarpos and many others.
Sow the seed in a wooden seedbox or terracotta pot, then place dry twigs and leaves over the top. Set these alight and have sufficient flammable material available to keep the fire burning for about 7 or 8 minutes. Then water lightly as for other sowings.
Seeds of Actinotus helianthi (flannel flower) sometimes germinate without treatment but often fail to do so. They often respond to burning, but only for 2 or 3 minutes.
When to sow?
Generally spring and summer are the best seasons; winter temperatures retard germination and subsequent growth while summer is too humid on the coast and too hot inland. This is not to say that you cant sow at other times; only experience and experimentation will tell you which season best suits a particular species, though most annuals prefer early to mid autumn.
How long to germinate?
This can range from a few days in the case of some annuals (particularly the "daisy" family) to 3 months or even longer.
While you're waiting
The containers in which you've sown the seed should be in a position to get plenty of warmth and light; full sun in spring and autumn, provided they NEVER dry out. They need shelter from rain, which disturbs the seeds. A sheet of glass or perspex, large enough to cover several containers, is a good idea; it keeps the soil moist while protecting it from rain. It must, however, be removed IMMEDIATELY the seedlings appear.

[Front Page] [Features] [Departments] [SGAP Home Page] [Subscribe]
Australian Plants online - December 1998
The Society for Growing Australian Plants
|