|
[Front Page] [Features] [Departments] [Society Home] [Subscribe]

Short Cuts
Short items of interest about Australian plants selected from the many newsletters and journals published by member Societies of ASGAP.......
Short Cuts in this issue:
 Scarlet Fuchsia: Graptophyllum excelsum Scarlet Fuchsia: Graptophyllum excelsum- Often mistaken for an Eremophila, scarlet fuchsia deserves a place in any garden
- Vegetative Propagation
- Why are some people more successful in striking cuttings than others?
- Treatment of Pea-type Seed
- A simple improvement on an old, established method
- Bush Tucker - Burdekin plum
- Does this fruit have a commercial future?
- Hakeas and Yellow-tailed Black Cockatoos
- An unexpected visit from one of Australia's largest cockatoos
- Banksias and Drought
- How to help your banksias survive extended dry periods

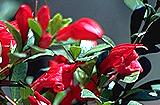
Scarlet Fuchsia: Graptophyllum excelsum
The Scarlet Fuchsia is a highly amenable plant of great beauty, suitable as a hedge, pot plant or garden specimen. Of great bird attraction and virtually pest free, Norm McCarthy asks "Why not grow one"???
Graptophyllum is a small genus of ten species in the family Acanthaceae. Four species are endemic to tropical or sub-tropical areas of Australa.
G.excelsum is a most attractive medium to tall shrub that has been well known to native plant growers for many years in
Queensland.
Sizewise it may achieve 1.5 metres to 3 metres high by a similar spread. It is medium to fast growing forming a pleasing, compact plant which may be judiciously pruned as desired to suit most situations.
The natural occurcnce of the scarlet fuchsia is from somewhat north of Cairns to approximately south of Gladstone on Queensland's Capricorn Coast. However, this most versatile plant is hardy and adapts to garden situations as far south as Melbourne and is resistant to light frosts.
Graptophyllum excelsum will plant will grow in a wide range of sites despite its natural habitat on rocky hillsides of limestone origin. It appreciates mostly full sun for better flowering and ample moisture for good growth. Waterlogging is not tolerated.
The upright dense foliage is advantageous for pruning and presentation. Leaves are alternate, glossy and may be 2 to 4 cm long x 0.5 to 1.2 cm wide, oblong elliptical, with margins mostly entire though sometimes toothed.
Flowers are tubular, 22 cm long and deep red with 2 stamens. They occur on short stalks either terminal or axillary, singly or in clusters. Flowering usually occurs from September to November and is spectacular.
It has been said to me, "What Eremophila is that?" At first glance there appears to be some similarity but there the resemblance ends.
Seed presents as an oblong capsule, not always available, so in general terms, reproduction is usually from half hard cuttings which strike readily. Mature plants can sucker, thus a new plant is born.
From "Native Plants for NSW", Newsletter of the Australian Plants Society (NSW), January 2002.
[ Return to Index]

Vegetative Propagation
Do you give your cuttings the best chance of striking? If you have problems, Jeff Irons suggests you think about the problem scientifically.
I wonder whether gardening has a patron saint? If it does not, then St. Augustine must be one of the more favoured contenders for the title. Although known best as a persecuting bishop, he did have softer and more humane moments. In one of them he wrote "Is there any more wonderful sight, any moment when man's reason is nearer to some sort of contact with the nature of the world than the sowing of seeds and the planting of cuttings? It is as if you could question the vital force in each root or bud on what it can do, what it cannot and why."
There can be very few gardeners of long standing who do not follow St. Augustine and plant their own cuttings. We tend to think that years of experience equates to quantity and quality of knowledge. That this is not so was brought home to me recently when an amateur gardener of my aquaintance commented that she always planted her cuttings as deeply as possible. My response caused her some surprize. I said that cuttings should never be stuck in deeper than 1 cm, and that some plants needed to be stuck so shallowly that the cutting had to be supported! Quite plainly, the principles of vegetative propagation are not at all well understood.
In England (at least) the media personalities are to blame. They tell and show what to do, but never say why. Here I want to say why, and give a little of the what. The latter relates to my conditions and I realise that many Australians live in areas where sophisticated materials are not readily available. They should find it relatively easy to adapt things to their own conditions, using what is available.
Any piece removed from a plant is immediately put under stress, and to minimize that stress we need to make the strain as small as possible. In other words we apply the Hooke's Law learnt in schoolday science to our horticulture.
In practice this means doing everything possible to keep a cutting turgid. If it is not going to be struck immediately the cutting should be placed in a plastic bag, together with a few drops of water. When the cutting is put into the cutting medium it should be kept in as constant a temperature as possible. The reason is that when the temperature rises the cutting's leaves transpire. The lost water has to be replaced, and doing that puts a strain on the cutting. Winter is a good time to take cuttings, because it is easy to keep the temperature, and hence humidity in the propagator fairly steady. If a cutting can be kept turgid then the time of year at which it was taken does not matter, for at some time during a 12 month period conditions must be suitable for rooting to take place.
The literature abounds with recipes for cutting mixes. The fact that there are so many is a good indication that the actual ingredients and composition are not very important!
In Britain one still hears people advising you to use clay pots for cuttings and to put them round the edge of the pot. A question asking "why?" might elicit the answer "Because it works". That isn't very satisfactory, and the thinking gardener will reason further. Clay pots are porous and water will diffuse from the body of the compost through the walls of the pot. So, close to the pot wall the compost is fairly dry, and it is under those conditions that the cutting roots. Eureka! We have the answer. What we need is a fairly open medium, so that the soil atmosphere is as similar as possible to the air. The portion of the stem in the medium must have an adequate supply of oxygen. It is necessary for respiration and root initiation.
The very wet, water retentive composts often used lead to waterlogging of the underground portion of the cutting. Fungal infection follows and the base of the cutting rots. The more deeply the cutting has been inserted the more likely it is that inadequate aeration will result in the cutting rotting. All reactions proceed more quickly at higher temperatures (schoolboy science again), so the higher the temperature the more likely it is that the cutting will rot.
An acid medium around pH 4.5 - 5.5 is usually preferable, but for a few species liming is required because the roots will not grow in the usual acid medium. An alternative technique, which I have used successfully, is to include Vermiculite in the cutting mix. Vermiculite is alkaline whereas Perlite is acid.
In order for a cutting to make roots it must use energy. That energy is obtained from light by the leaves. So we need to retain as many leaves as possible on the cutting. Moreover every time a leaf is removed a wound is made, and infection can enter through the wound. Since the young leaves on the softwood of our cuttings contain very little food, in theory the more light they are given the better they can photosynthesize the substances needed to make roots grow. However with high light levels the temperature rises and humidity falls. The cuttings wilt, the stomata close and photosynthesis ceases. So in practice a relatively low light level is best. Ideally it should be the maximum which can be given without inducing wilting.
It is tempting to take nice thick material for cuttings, but experiments have shown that the thinnest cuttings root more readily. Often they are the thin, spindly growth at the base of a plant. A little thought will indicate that such cuttings have less stem in proportion to the leaf area. Consequently less food is required to maintain respiration in the stem, and a greater proportion is available for plant growth. However thin cuttings rot more easily, so they need to be inserted shallowly. All should be inserted only as far as is necessary for them to stay upright.
Usually we take cuttings with the cut just below a node. At such spots the plant is growing vigorously, there are plenty of growth chemicals (auxins) because they are needed for production of the new shoots. By cutting off at that point we ensure that the base of the cutting is at the spot most favourable for root production.
Most amateurs use a simple propagator and with them it is not very important to pot on cuttings as soon as they have rooted. Mist units tend to leach materials from the leaves, so rooted cuttings should be potted on as soon as they can be handled.
In general a nutrient poor potting mix is desirable. I use the same one that was used to strike the cuttings. Once again that schoolday science explains why. In a nutrient rich potting compost there will be a high osmotic pressure, and the poorly developed roots will be less able to absorb moisture, and so find it difficult to supply the young plant with enough water. Starting off with a nutrient poor potting compost helps the young plant to absorb water. It is very important not to pot the rooted cutting too deeply. The uppermost roots should be just below soil level. If necessary the cutting should be supported with a small stick. It is very difficult to make the rooted cutting self supporting, but doing so by deep planting is one of the commonest causes of failure at potting on.
A new development which both improves the 'take' of cuttings and avoids problems when potting on is the rock wool plug. Rock wool plugs ensure good aeration and even 'difficult' plants root well in them. Once rooted, cuttings can be potted without root disturbance and by putting the top of the plug at soil level the correct depth is ensured.
Equipment has not been mentioned in these notes. If attention is given to the points made even the simplest equipment will suffice. Good results are possible with nothing more elaborate than a flower pot and a cover made from a PET bottle with the base cut off.
From the newsletter of ASGAP's Epacris Study Group, March 2000.
[ Return to Index]
Treatment of Pea-type Seed
A fast-food container, some sandpaper, glue.....just what has Brian Roach been cooking up in the kitchen??
I thought I'd pass on a new method I'm using to treat Acacia and pea-type seed prior to sowing. The typical treatment, of course, has been to pour boiling water over the seed (preferably after removing it from the plant), and let it stand overnight. While that method has stood the test of time, I have encountered several disadvantages with it. So often I've done the boiling water bit and then forgotten all about the small bowl that I put on top of the kitchen cupboard until cross-examined by Carol, my wife, as to its whereabouts. By then the seed has gone to pulp. If, on the other hand, I remembered to salvage the soaking seed, another problem arose.
After pouring off the water, the time comes to extract seed, one at a time from the soggy mass. Tweezers are ideal, but I can never find a pair. So I resort to using fingers. For me it's just about impossible to pick up one wet seed from that soggy mass. I always get at least two on the tip of my finger. Assuming for a minute I managed to get one seed on the tip of my finger, I would then place it over the position I want it in the seed-raising tray.
A slight shake of the finger does nothing to extricate the seed. A harder shake, and still the little bugger's on the tip of my finger. Harder still and the seed flies off, falls to earth I know not where, except that its definitely not in the tray and I can't find it. Is there little wonder I've been looking for a better method?
Probably I read about it somewhere. Basically, it's the sandpaper method (where the impervious seed coat is abraded by rubbing between two sheets of sandpaper....ed), but an improvement on the one-at-a-time, de-tipping your finger method.
I got a small plastic container (Carol hasn't noticed it missing yet) and lined it internally with a coarse grade sandpaper. This simply involved cutting the sandpaper to fit inside the circular sides of the container (about 10 cm) as well as on the bottom and inside of the lid, and gluing the pieces in place. A few months ago it underwent trials with the seed of Senna artemisioides. I shook the seed in the container for a couple of minutes and that was it.
It was a delight handling the dry seed; even when I picked my nose the seed didn't stick to my finger! What was an even greater delight was the extraordinary rate and extent of the germination. The only problem now is whether to own up to the misappropriation of the plastic container. But it couldn't be used for anything else now, because even if the sandpaper is removed there's still all that glue inside!
From the July 1995 issue of "Blandfordia", the Newsletter of the North Shore Group of the Australian Plants Society.
[ Return to Index]
Bush Tucker - Burdekin Plum
Greg Calvert describes a native fruit which may become more common in jams and other produce in the future......
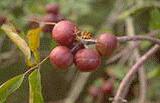
Burdekin plum (Pleiogynium timorense) can be a large and shapely tree to 20 metres or more under good conditions, or a stunted, almost bonsai shrub under harsher conditions.
Formerly known as Pleiogynium solanderi, the Burdekin plum has a dark grey trunk and often glossy, compound leaves. This tree can be found in vine thickets, gallery rainforest and along creek lines in tropical Queensland and Papua New Guinea.
Even within a small area, Burdekin plum can be extremely variable in appearance and the fruit vary considerably in size, colour and taste. In the wild, fruiting occurs in the winter months and seeds are apparently dispersed by flying foxes and wallabies. As with its close relative, the Mango, the flowers are small and insignificant.
Seeds germinate readily if they have been soaked in a bucket of water for 24 hours prior to planting. Burdekin plum can be a little slow in the first couple of years, but soon puts on some fairly rapid growth. Eight years seems to be the minimum age for fruiting. However, grafting may produce some interesting effects. Burdekin plums are widely grown in Townsville gardens and revegetation projects.
The fruit were popular with Aborigines, explorers and settlers, but seem to have fallen into disuse sometime after World War II. They are fortunately experiencing a revival.
The large, black, globular or pumpkin-shaped fruit vary in taste. Those that have red-purple flesh are quite tart, those with a pale greenish-white flesh are milder but less tasty. Some fruit are half red - half white and these are delicious! This variety occurs naturally around Townsville.
The riper the fruit, the less unpleasant the drying effect of eating the fruit. In the centre is a large pitted stone which usually fills 70-80% of the total fruit. They do not ripen on the tree, but must be stored, either buried in sand or kept in paper bags in a dark spot for a few days.
They can either be eaten raw, cooked into jam or jelly, used to flavour meat, or to make wine. A ripe fruit is mostly water (73%), but has moderate levels of energy, fat, vitamin C and is high in fibre and most minerals. Analysis has shown that, like tree shape and fruit colour, the nutritional content is extremely variable between trees.
Experimental plantations are being established and there seems to be enormous potential for selecting superior varieties and grafting. The timber is regarded as one of the best native timbers by wood turners, who prefer to salvage fallen trees rather than cut down such a useful tree!
Look for the old seeds underneath the tree. They look like little UFOs with portholes in the side.
Burdekin Plum is in the family Anacardiaceae, along with mangoes and cashew nuts.
(Reprinted from "The Native Gardener", SGAP Townsville Newsletter, August 1997)
[ Return to Index]
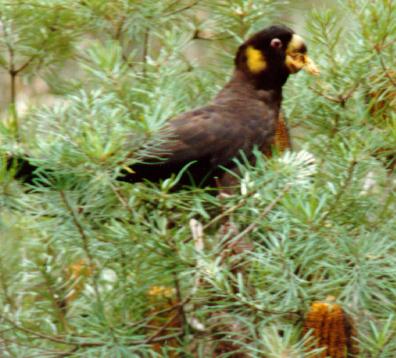
Hakeas and Yellow-tailed Black Cockatoos
Destructive they may be but a visit from a group of yellow-Tailed Black Cockatoos is an experience not easily forgotten - as Anne Rees explains........
What a sad and sorry sight our small grove of Hakea salicifolia are at present.
We grew these hakeas beside the lower side fence to create a windbreak. The vegetation over the fence in the reserve at this spot is not dense, so on windy days with the wind sweeping down the golf course from the south-west, our small eucalypts and Allocasuarina were taking a buffeting and they all started to develop an undesirable lean towards the east.
Perhaps we could also say that we grew the hakeas as a golf ball break. Just over the fence and edging the reserve is the 16th hole of the local golf course, affectionately known as the "plum pudding" by the golfers because the green rises up at the bottom of a hill in the shape of a very large plum pudding. From high up on the hill the golfers hit off towards this hole, said to be the most difficult one on the course. This must be true because we regularly pick up golf balls in our garden, and some, those that ricochet off the messmates, come close to our house. Some golfers must take a mighty swing in their efforts to land their ball on this green.
The hakeas, planted close together, grew well and they formed quite a dense screen. Hakea salicifolia is not showy, but it is a good screen plant, hardy, with small white flowers in spring followed by fruits that are large and warty. Our small trees commenced flowering about three years ago so the plants were covered with quite a number of fruits.
Four pairs of Yellow-tailed Black Cockatoos, each pair with a young bird, found the hakeas one afternoon recently. The adult birds spent over two hours feeding on the hakea fruits, climbing around in the small trees, as the young birds, constantly begging to be fed, flew back and forth between the hakeas and messmates in the reserve. With the adult birds clambering up the branches as they fed and the youngsters landing on branches that could not take their weight, our trees have been left looking very forlorn, with many broken branches hanging down all over the trees and there is a carpet of bits and pieces underneath the hakeas on the ground.
Still a quick tidy up will have them looking good again and they will soon put on new growth. We could have moved the birds on of course, but why would we, to see such a wonderful sight as these magnificent birds up so close, feeding in our garden was truly
a privilege and a delight.
From "Growing Australian", newsletter of the Australian Plants Society (Victoria), June 2003.
[ Return to Index]
Banksias and Drought
The recent drought in many areas has taken a toll on many plants, particularly banksias. Warren and Gloria Sheather describe their approach to helping their plants survive.
During the big drought (2002 - early 2003) the plants in our garden survived remarkably well. Banksias were the exception. We lost a number of specimens in the extremely dry conditions.
Banksias appear to have an adventitious root system (similar to grasses except on a larger scale). Most native plants have a long taproot that is able to access water at sub-soil level. Banksia roots may not penetrate to these depths particularly with young plants. Also banksias have leathery leaves that maintain their shape and do not wilt when the plant is under water stress. By the time we notice their discomfort the plants are usually dead.
We decided to try to deliver water directly to the plant's roots. Each time we plant a Banksia, a length of plastic polypipe is planted beside each one. We are using 37 mm (1.5 inch) polypipe and each piece is 300 mm (12 inch) long. The pipe is placed beside the plant with about 150 mm, sticking out of the ground. We also build up the soil and mulch around each plant to form a saucer-shaped depression. The idea is to fill the pipe with water each time the new plants are watered and also mature plants will be watered, using this method, during dry periods. Hopefully this watering system will allow our banksias to survive and thrive.
We find it more horticulturally pleasing to see green-foliaged banksias than specimens with brown leaves.
From "Native Plants for New South Wales", newsletter of the Australian Plants Society (NSW), July 2003.
[ Return to Index]
[Front Page] [Features] [Departments] [Society Home] [Subscribe]
Australian Plants online - September 2003
Association of Societies for Growing Australian Plants
|