|
[Front Page] [Features] [Departments] [SGAP Home Page] [Subscribe]

Gardening by Computer
Alison Payne
The Software
(Editors Note: The "screenshots" which accompany this article have been reduced in size and, as a result, do not have the same degree of clarity as those produced by the software. However they still give an indication of the capability of the programme)
"3-D Landscape" is a landscape design software package. It allows the user to design a complete garden, including almost everything you could think of for your garden. This includes house, arbors, arches, specific plants, dogs, fences, birdbaths, as well as a large range of generic and specific plants. Each of these items can be customised. For example, you can choose a particular pitch, material and colour for the roof of your house. You can choose a particular shape, height, width, flowering season, flower colour etc for your plants.
The program supports accurate scale (height, depth, width etc) and 3-dimensional viewing. The user can effectively "walk and fly" around the garden, viewing it from any angle and direction. This allows the user to consider the implications of a new tree or garage etc on the overall look of the garden. Things such as privacy can also be considered by walking past your garden. If necessary, you can have a look at what your garden looks like to the police helicopter when it flies over!
Facilities to simulate the movement of the sun and shadows during a particular day or season are also provided (including being able to specify latitude). This feature takes account of any structures you have entered in the garden, and allows you to consider the aspect of any beds you have planned for your garden, and the implications of a new 30m tree in the front yard before it has grown Seasonal considerations can also be considered by choosing when you wish to view your garden from the four seasons. Deciduous trees loose their leaves in winter. Flowers come and go during the year depending on the specification in the plant database. It is also possible to specify the age of a plant when you put it in and consider its growth over time. This feature uses database information about the plant. For the impatient among us, this allows us to see what the garden should (!!!) look like in a particular number of years.
The plant database which supports most of the program features offers a large number of plants in-built and also allows you to enter and store your own plants. It is then possible to search for a plant in the database by specifying particular characteristics you desire for a particular position. It also has photos of many of the plants and allows you to get a feel for the look of the plant when places by supporting a variety of foliage types.
The marketing for this product includes statements such as "Great Realistic Views of Your Dream Landscape in Minutes", "Visionary Home and Garden Software" and "So real you can almost smell the roses". These statements aren't too far off the mark, although the minutes may be hours and I don't have a smell card to test the final claim. The "photo-realistic" representation of the garden is a little overstated, but the pictures are good. I found the program generally easy to use and to support a vast majority of the things I would want to do in our garden. I have successfully used it to draw up plans for our front yard and to test out many different scenarios I have dreamed up for it.
|
"There are areas in which it falls short, in particular only a few Australian plants exist in the database which
limits the usefulness of a number of the features."
|
|
There are areas in which it falls short. In particular, only a few Australian plants exist in the database which potentially limits the usefulness of a number of the features. The in-built plants have quite a lot of information stored about them while those which you enter yourself are restricted in what you can enter. However, the author believes that anyone with a little technical expertise in computing and in Australian plants, should be able to include detailed information in the database adequately and overcome these hurdles."
Example Application : Our Front Yard
You may wonder why have I spent time playing with a computer-based landscaping program? The short answer is we are in possession of a garden in need of landscaping!
To be a little more verbose, the house and garden we are the proud owners of requires a little work. While solid and established, the house and garden have been a little neglected over the last few years of the previous elderly owners occupation. Trees have overgrown their position, many are hacked and straggly. The beds and garden style do not suit us, with much use of narrow, raised concrete garden beds and "mulch" of slate and pebbles. The established plants are, all bar one, exotic and the sole Melaleuca nesophila is on a 30 degree angle to the ground plonked in the middle of the front lawn. Many features of the garden were designed to absolutely maximise privacy, with large bushes and shrubs and lattice covered with creepers dividing the front garden into street and house areas.
The house has wonderful quantities of glass windows, and now that we have taken the "carport-from-somewhere-dark-and-dingy" down, there are many parts of the house from which we could view a nice garden. The street is quiet and neighbours are far enough away that the front can be opened up and made into one flowing garden (with a little lawn to balance it). We are working towards an Australian native garden, with the associated all-year flowering and bird life. We hope that we may enjoy it both from the inside of the house and also provide ourselves with more outdoor living and entertaining areas.
The following sections detail our progress on this project and in particular, the help that 3-D Landscape has provided to us.
Stage 1 : The Basic Plan
The first step in our garden redesign process was to get a basic, accurately dimensioned plan of the front yard. I have tried this previously using photographs and tracing paper but have been frustrated with the limited nature of this approach. I never seemed to have the view I wanted of the house, and I found it virtually impossible to hand draw realistic, correctly dimensioned plants, let alone keep the dimensions consistent over multiple views.
3D Landscape was a huge step forward in my drawing of the basic front garden plan. Armed with the original house plans, including positioning on the block, I merrily entered our pinkish brick house, red medium pitch tiled roof, doors and windows. Our garage went in too, with its flat roof and large door. All either exactly dimensioned from the house plan, or guessed from my memory, aided by being able to view the house in 3 Dimensional mode.
The major components defining the region in which we were to plan our garden were the next to be entered. The street, footpath, fence (both the brick fence across the front and the paling fences along the side). The driveway, slate paved area and the carport (disguised as an arbor) also went in. The gate and brick wall dividing the front yard from the backyard were also placed.
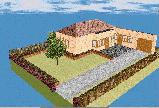
Here's the top view of the old garden with the Melaleuca nesophila in the front lawn. Select the thumbnail image or highlighted phrase for a higher resolution image (35k).
So far, so good. All of these things were quite easy to enter and all could be specified to a reasonable degree. The picture had started to look like our house - a little naked without the trees - but the fundamental area we had to work with was defined. We were able to "zoom" around the garden using the walkabout 3 dimensional feature and get an idea of the space we had without the clutter of the current "fixtures and fittings".
Stage 2 : The Current Garden
The second stage of the process involved putting in the current garden structures and plants. I could enter the raised concrete beds which grace the external edge of the entire area. It is possible to specify the height, width and shape of beds very accurately. The lattice separating the paved area from the garden could be entered (although I couldn't find anything that adequately captured the venetian blind and old bits of metal which made up the lattice).
The next thing I did was to enter some of the major trees and shrubs which have a chance of surviving our redevelopment. I chose a rounded style deciduous tree general type for one of them, and a more sprawly option for the other. These general types weren't bad representations for the trees. I estimated their size by standing in the front garden and seeing where they came up to on the house (and other structures I had measurements for), rather than meticulous tape measuring. Other shrubs such as a hibiscus and the jasmine, I found in the plant database and happily put these on the drawing, changing the size of the plant appropriately. There were some limitations. It wasn't possible to capture the 30 degree lean on my favourite native plant, or the butchered nature of some of the trees. I figure that these things aren't that important in the scope of the general design.
I also put many of our new "baby" plants into the plan, guessing as I went on basic (again generic) shapes and fully grown heights. I began entering some of these plants into the database but tired of doing this for the whole garden before I had worked out the general design. One thing I did discover was that my estimation skills are somewhat lacking with many of my plants too close together and way too big for the spots I had chosen for them. I think this is one of the most useful aspects for the beginner. To get an idea of how the garden may look fully grown is hard without experience. I feel this program might help the process along a little.
Again, relatively easily (probably by the second lunchtime's "playing") I had a general picture of the current front garden, ready for some serious experimentation.
Stage 3 : What If...
There were many things I wondered about the front garden - many, what if that wasn't there, what if we changed the shape of this etc. The program enabled experimentation with these ideas, and then the scope to view and assess the impact of the changes. The following are a few of the things I tried.
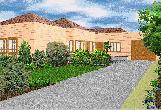
One of my early attempts to plan the front garden. You'll see I have far too many plants in the garden, but I was trying to capture a "full" garden with the general shapes I should try for in the beds. Select the thumbnail image or highlighted phrase for a higher resolution image (49k).
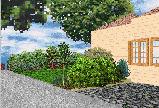
And here is the same front garden. looking back towards the road. I played a lot with the general heights and depths of the plants and beds Select the thumbnail image or highlighted phrase for a higher resolution image (49k).
The Carport: The carport had to go! That was one thing we were sure of. But what of the implications of sun on the many glass windows underneath it? Would the house look odd and bare without this structure? The shadow castor was useful to have a look at what happened with the sun. We could see from the program that the shade of the trees and of the house protected the windows during most of the day. We also got a sneak preview of the quite normal house which would emerge in the life after the carport, and how the beds around the house (currently with no light and white pebbles) might look with some healthy plants in them.
The Beds: Again, it was obvious the beds were too narrow, probably too high, and with ugly edging. But what do we replace them with. The program gave us the opportunity to try out a number of different shapes and forms for the beds. It’s one thing to guess what sort of shapes would complement the house (again experience would help) but it’s another thing to see them in operation. A number of lunchtimes again passed considering squares, curves, hexagons and circles in the medium of our front yard.
Saving the Melaleuca: The Melaleuca looks funny. It sticks out in the middle of the lawn looking lost. The program was used to see if there was anyway that the tree could be lowered from its sore thumb status. Much of the bed planning exercise was engaged in putting beds around the Melaleuca. Unfortunately, I am now convinced that it has to go.
Lattice: The lattice forms a very distinct division between the house and the garden. To its right is slate and no plants and to its left the garden. The program gave us the opportunity to try out "softer" ways of dividing the two components. Plants could be put in various places on the slate. The plants in the garden could be placed to hang over the slate. Privacy issues with the lattice were resolved by considering other ways to protect the windows without the current 2 metre barrier. The lattice is also going and we are happier to open up the front yard a little more now we have seen what it might look like and considered some other options.
Generic Plant Shapes and Sizes: So, what size plant do I plant where? It is difficult to decide what size plants to put in the garden. Also, how to get some balance between shapes and sizes of plants. The program has allowed me to experiment with many shapes and sizes of plants without having to nominate particular ones, to try and get something that "looks right". I have put together multiple possibilities for this and I guess will continue to play with the options for quite some time yet. For starters, I have a still developing general plan for the garden.
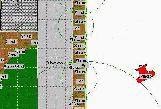
An overhead plan view of part of the design. The programme allows the user to place trees, shrubs and structures and then view a 3D representation based on the camera angle. Select the thumbnail image or highlighted phrase for a higher resolution image (34k).
Stage 4 : The Future.
Too much playing with a computer and not enough gardening can make your eyes go funny and your fingers go brown! Finally, it was time for action. We knew that we did not have time to take on the scale of redevelopment we envisage in the front garden, especially with plans for major autumn plantings. The next step was to find a professional landscaper, to get advice about our amateur ideas and to do the hard work of driving the bobcat/shovel.
My first attempt with a major nursery left me a little deflated. I have faith in their skills, but the range and availability of interesting Australian plants was just about nil (how many red bottlebrushes can one fit in one small front garden?). We're currently looking for other landscapers to get second opinions.
One thing the experience has taught me is that I am probably interested enough to learn to design my own gardens. I think the program will again help me with this, by allowing me to choose the plants I like the look of and then to have a pre-planting attempt at placing them in my virtual garden. I can use the program to check flowering times, making sure I have a range of plants in each garden, and it may also be useful to keep a record of what the plants are.
Well, the real front garden is still in Stage 0, but the program has provided many opportunities to do low effort major rearrangement and a good interface to view the results. It’s not perfect, but it’s useable multimedia software!
"3-D Landscape" is produced and sold by "Books that Work" (http://www.btw.com/products/3dlan/3dlan.html), a US company and versions are available for the PC and the mac. The PC version requires at least a 486/66 PC running Windows 3.1 or 95, 8M RAM, VGA graphics, CD-ROM and sound card. It costs $US59.95. A demo version is available from the web site. This demo has limited functionality but provides an idea of the look and feel of the product.
Unfortunately, I have been unable to find an Australian supplier (although my search hasn't been exhaustive).
Alison Payne's enthusiasm for the diversity and beauty of Australian plants has been aided in no small way by a parallel developing interest with her partner Tony in creating a peaceful and "natural" home environment. A desire to see Australian Plants displayed to their full potential has led to an interest in the principles of landscaping. The computing side of the "interest" has come from Alison's computing career with Telstra Research Laboratories in Melbourne founded on a PhD in Computer Science from The University of Queensland.
 [Front Page] [Features] [Departments] [SGAP Home Page] [Subscribe]
Australian Plants online - June 1997
The Society for Growing Australian Plants
|