Plant Propagation
Many plants can be propagated easily using very basic tools and methods. It’s a lot of fun and definitely within the ability of any home gardener. No ‘green thumb’ required!!
See the sections below for the various plant propagation methods.
Seeds of Australian plants can be purchased from several commercial suppliers and some Regional groups of the Society can provide seed of a range of different species to their members.
Not all seed germinates easily. Some seeds have a physical or chemical inhibitor to germination designed so that the seed will only germinate in natural habitats when conditions are favourable. In some cases the inhibitor can be overcome by pre-treatment of the seed before sowing but with others, successful germination has defied all attempts. Beginners are advised to select seed of species which are known to give reliable results. These include Acacia (wattles), Banksia, Callistemon (Bottlebrushes), Eucalyptus, Hakea, Hardenbergia and Melaleuca to name a few.
Pretreatment
For those species where the seed has a natural inhibitor to germination (or dormancy), pre-treatment must be provided before successful germination will occur. There are several pre-treatment methods which can be used:
Boiling Water
This is the most common pre-treatment method and is most commonly used with seeds in the ‘pea family’ (Fabaceae) such as Senna, Acacia, Hardenbergia and Kennedia in which the hard seed coat forms a physical barrier which is impervious to water.

These plants are often native to areas where bushfires occur at regular intervals – the heat of the fire cracks the hard coat and allows moisture to reach the embryo inside. Pouring boiling water over the seeds simulates this effect.
The seeds to be treated are placed in a container, covered with boiling water and allowed to stand overnight. Seeds that soften and swell to 1.5-2 times their original size can be sown; those that don’t swell are retreated. Any seeds which float are usually infertile and can be discarded. Seed that does not swell after several repeated soaking may need to be treated differently, such as by abrasion – see below.
In some cases seeds will not tolerate excessive time in boiling water and respond better to a one minute immersion in boiling water followed by cooling down. Acacia species native to areas where relatively quick grass fires occur may be in this category.
Abrasion
This can be used as an alternative to boiling water. Seeds are abraded between two sheets of fairly fine sandpaper to reduce the thickness of the seed coat. This can be cumbersome and an alternative is to glue sandpaper to the inside surfaces of a small plastic container, put the seeds in and then shake the container vigorously.
Stratification
A type of dormancy often encountered with seed of species native to alpine or semi-alpine habitats is a requirement for a period of cold conditions prior to germination. This requirement can be accommodated by placing seed in a closed container (containing moist vermiculite or similar material) in a refrigerator for 1-3 months before sowing. This procedure is referred to as”stratification” and examples of seed requiring this treatment are Banksia canei, B.saxicola, Eucalyptus kybeanensis, E.pauciflora, E.regnans and E.delegatensis.
The method has also been applied with some success to non-alpine plants such as Anigzanthos sp. (Kangaroo Paws).
Fire
Apart from the pea family, some other seeds seem to require the passage of a bushfire to germinate. Flannel Flowers (Actinotus helianthi), for example, are usually seen at their best in the wild in the seasons immediately following a bushfire. This effect can be simulated by sowing the seed in a terracotta pot (not plastic for obvious reasons!) and setting fire to leaf litter and twigs placed on top. The fire should be maintained for 2 – 3 minutes. This method has worked but is really a “last resort” method as it is difficult to have any real control over the amount of heat delivered to the seeds. Once the ash has cooled, the pot is watered and maintained as for any other seed raising container.
Smoke
Research in South Africa and Western Australia has shown that smoke is a critical factor for promoting germination of seeds in areas subject to bushfires. The following article was published in the newsletter of the Australian Flora Foundation and summarises recent research:
Several other articles outline some of the general principles involved:
- Review of the Promotive Effects of Smoke on Seed Dormancy
- Smoke Germination of Australian Plants; T Vigilante et al. RIRDC; Publication no: 98-108
- Smoke Stimulates the Germination of Many Western Australian Plants
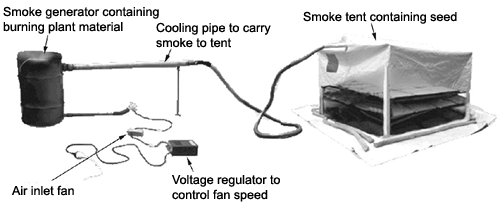
Diagram from Rural Industries Research and Development
Corporation Short Report No.48
On a large scale, an apparatus like that shown in the diagram can be used to apply smoke to batches of seed. However, this is not particularly practical for the average home propagator.
One practical method of applying smoke treatment is the use of smoked water as a pre-treatment where seed is soaked for 12 hours in a 9:1 water:smoke-water solution. Smoke water can be produced by bubbling smoke through a container of water for about 60 minutes after which the solution is frozen until needed. However, even this is a bit messy. Fortunately, some shortcuts are available:
- Smoke Water: A product called “Regen Smokemaster” is available, although it’s not the sort of item stocked by your average garden centre. Further details from the Greyson web site.
- Smoked Vermiculite: This is a dry granulated smoke-infused product, specifically designed for use on seed trays. Small quantities, sufficient for small-scale use, can be obtained from Nindethana Seed Service. “Seed Starter” granules that may act in a similar way to smoked vermiculite are available from Australian Wildflower Seeds.
- Smoked Paper Disks: These apparently originated in South Africa. The seeds are soaked in a container containing one of the disks for 24 hours prior to sowing. These disks are also available from Nindethana Seed Service.
Smoke Responsive Species. In some cases germination has been achieved with species that have proved very difficult or impossible to germinate in the past (eg. Calytrix, Conostylis, Dianella, Eriostemon, Geleznowia, Lechenaultia, Philotheca, Pimelea, Stylidium and Verticordia. For a listing of smoke responsive species, see the Grayson web site.
Leaching
With some seeds there is a chemical inhibitor present which prevents or delays germination. In some cases it is possible to remove the chemical by leaching with various solutions. For example, it has been found that suspending seeds of Eriostemon and some Correa species in a muslin bag in running water for 1-2 weeks improves germination substantially. Unfortunately this is not particularly practical for the home gardener although it has been suggested that leaching could be achieved by suspending the bag in the cistern of a flushing toilet! Other leaching solutions that have been used include alkaline solutions.
The growing medium
A good medium both for seed raising and for subsequent potting-on consists of 80-85% washed river sand and 15 – 20% peat moss. This mix has been used successfully by many growers over a long period although, given the environmental problems associated with peat extraction, an artificial peat moss would most likely be substituted by many propagators. There are a number of these “artificial” peats available made from waste products such as coconut fibre.
Of course, commercial seed raising mixes can also be used. The medium should be reasonably moist before sowing the seed.
Planting the seed
Seed can be sown into punnets, small pots or tubes and is normally covered to a depth of about double the seed diameter. Fine seed is usually sprinkled over the surface of the seed mix and need only be pressed down firmly onto the mix without being actually covered. Large seed needs to be well spaced to facilitate later transplanting. The use of individual tubes is an advantage when only small quantities of plants are required. This allows large seed to be sown one to a tube while fine seed can be thinned out as germination occurs to leave the strongest single seedling.
Care and attention
After sowing, the seed bed needs to be kept moist and sheltered from drying winds and from rain. Some sunlight is an advantage.

With overhead watering, a fine spray is necessary to avoid damage to small seedlings. A good method of watering for small quantities of seed is the use of a capillary bed (as shown in the diagram). With this arrangement, overhead watering is not needed and the seed and seedlings can be left unattended for 2 or 3 days (up to a week or more in cooler weather). The seed mix in the containers needs to be fairly moist before the containers are placed in the capillary bed otherwise the capillary action may not occur.
A similar method is the so-called “bog method” where the pot containing the seed is placed into a saucer of water until germination occurs.
Pests and diseases
‘Damping-off’ causes rotting of the stems of seedlings at soil level, particularly in seed mixes that are over-wet. The problem can be difficult to control without the use of a fungicide. The use of sterilized seed raising mixes and sowing so that seedlings are not crowded are the most effective ways of preventing infection.
Snails and slugs can cause rapid destruction of small seedlings. If these can’t be controlled by physically removing them, the usual baits should give protection. Any caterpillars that appear are best removed by hand…the use of chemical sprays is hardly justified for this situation.
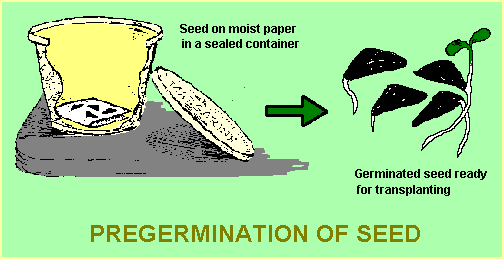
Pre-germination
This is a useful technique for large seeds (ie those which can be handled easily individually). It involves sowing seed into a sealed contained containing a layer of moist vermiculite or even a moist paper towel. Any required pre-treatment needs to be carried out as normal before sowing. The container is then placed in a cool, dark place and checked every week or so until germination commences. Any seeds which have germinated are carefully removed and potted into small pots or tubes as described below. The remaining seeds are re-sealed in the container which now needs to be checked every 1 – 2 days as germination of the remaining seeds usually occurs quickly once germination has commenced.
Using this method, seed can be sown during the colder months when outdoor temperatures may be too cold for effective germination.
Transplanting
Seedlings growing in punnets or the like can be potted into individual tubes (or small pots) when they are large enough to be handled. This is usually when the second pair of leaves appears. Individual seedlings are carefully removed from the seed bed using a knife or narrow spatula (eg. a piece of aluminium about 100 mm long by 10 mm wide is suitable). Each seedling should be placed into a partly filled tube and potting mix gently firmed around it preferably using a gentle water spray from a hand-operated spray bottle. A small amount of slow release fertilizer in the potting mix is an advantage at this stage.
Growing-on
After transplanting, the seedlings need to be placed in a protected position for a couple of weeks and gradually moved into a situation where full sun is available for at least part of the day. The seedlings must not be allowed to dry out and the tubes containing the seedlings could be placed in a capillary bed to minimize this possibility. After 1-3 months tubed seedlings will be ready to transplant into larger (125 – 150 mm) pots.
Planting out
Plants will be ready for the garden when good root development has occurred. This can be checked by carefully tapping the plant out of the pot. The roots of the plants should not be allowed to become “pot-bound” (ie. develop into a tight, coiled mass). If this does occur, some root pruning will be needed before planting to ensure that the roots of the plants can easily spread into the surrounding soil.
A cutting is a piece of the stem of a plant which, under suitable conditions, will initiate root growth. Propagation by cuttings has a number of advantages over seed propagation, the most important of which is the reproduction of plants of identical form and flower colour as the parent. This cannot be guaranteed with seed and, for this reason, named cultivars should not be propagated from seed and, if they are, they MUST NOT be distributed under the cultivar name.
Collection of material
While many plants are easily grown from cuttings, some can be quite difficult. Beginners are advised to start with species that are known to give reliable results. These include Callistemon, Correa, Melaleuca, Prostanthera and Westringia to name just a few.
Cuttings should preferably be taken from firm, current season’s growth. Both hard, woody material and soft, ‘floppy’ growth are generally less likely to be successful. The suitability of the material can be tested by bending the stem through about 60 degrees. If it springs back to its original position, it should be suitable, but if it breaks or remains limp, it is best avoided. Sometimes, however, the only material available will be less than ideal and it need not be rejected because of this – successful cuttings can sometimes occur from the most unlikely looking material. When trying to propagate a particularly valuable species, any cutting is better than no cutting!
Cuttings can be taken at any time of year but root formation is usually very slow in the colder months unless supplemental heating is available – see Advanced Techniques for further information on this.
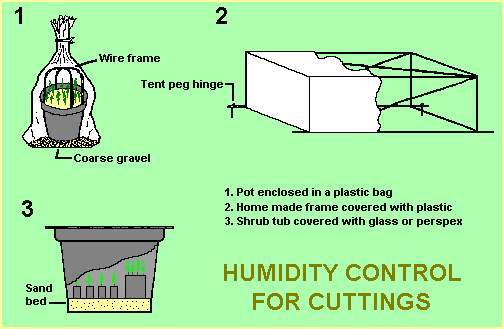
Equipment
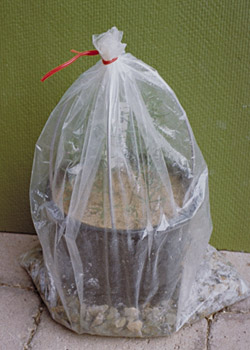
The main requirements are a clean, sharp knife or blade and a “cold frame” to maintain a humid environment while roots are developing. As shown in the diagram, the ‘frame’ could consist simply of a plastic bag tied around a pot of cuttings. For larger quantities, a small frame could be built or a large, perspex-covered tub could be used.
Containers and potting mix
Cuttings can be placed into either individual small tubes or a number of cuttings of the same species can be placed into a single ‘community pot’. A potting mix consisting of 75-80% washed river sand and 20 – 25% artificial peat moss has been found to be suitable as a general purpose mix for cuttings. In time most growers develop their own mix “recipe” to suit their individual needs.
Preparing the cuttings
Cuttings are generally about 75 mm long although this will vary depending on the physical size of the stem and leaves of the plant.
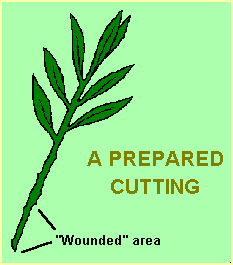
If the material is suitable, two or three cuttings can be made from the same piece of stem. The lower end of the cutting is usually cut directly below a leaf/stem junction (a node) as this is claimed to promote more reliable root formation. Whether cutting below a node is absolutely essential is debatable but it is a good rule to follow if possible. The bottom half to two thirds of the leaves are stripped off if this can be done without tearing the bark, otherwise the leaves should be carefully cut off. Large leafed species should have the area of the remaining leaves reduced by about a third.
The lower 15 to 20 mm of the cutting can be ‘wounded’ to encourage root formation over a larger area; this is done by removing a small sliver of bark with a sharp knife, as shown in the diagram.
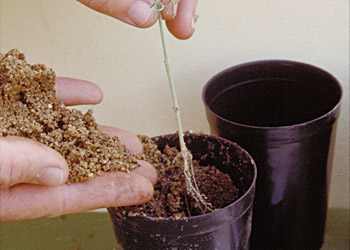
Root-promoting chemicals
Root initiation can often be assisted by use of certain hormone preparations. The most common is Indole butryic acid (IBA) although Naphthalene acetic acid (NAA) is also used, sometimes in combination with IBA. These hormones are commonly available in a talc-based, powder form and are applied to the base of the cutting, as shown in the accompanying photo. The ‘medium’ strength is recommended for most applications. Liquid or gel preparations are also available and many experienced propagators regard these as being more effective than the powdered form.
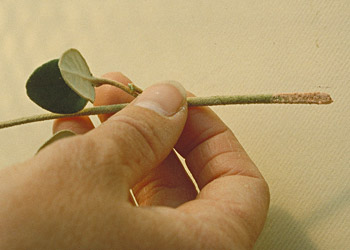 |
| Applying a talc-based hormone powder to the base of a cutting Photo: Brian Walters |
Whatever the form of the hormone used, it should be appreciated that they have a limited shelf life. To extend the useful life of the products they should be stored in a cool, dark place (such as a refrigerator) when not being used. It is also recommended that a small quantity of the hormone be taken from its container for each propagation session and, to avoid contamination, any residue should not be returned to the original container.
Setting the cuttings
To prevent damage to the ends of the cuttings, it is preferable that they not be pushed into the potting mix. A hole can be prepared for each cutting using a skewer or something similar, and each cutting should be placed so that it touches the bottom of the hole. The potting mix should then be firmed around it.
After all cuttings have been ‘set’ they need to be watered and placed in the propagating frame in a shaded position. The frame should be kept closed to maintain humidity and should also be kept as full as possible for the same reason. If insufficient cuttings are available, empty areas can be taken up with open containers of water.
Care and attention
 |
 |
|
| Left: A batch of prepared cuttings …note the wire frame which prevents the plastic bag from collapsing Right: Roots protruding from the drainage holes indicate a group of well struck cuttings! |
||
While root formation is taking place, the aim is to keep the potting mix moist (not wet) and the foliage of the cuttings cool. In hot weather a light spray, sufficient only to wet the foliage, can be applied in the morning and evening and a more thorough hosing given as needed. The frequency of hosings depends on the circumstances but is unlikely to be more than twice a week in hot weather. The foliage spray should be minimized for cuttings with dense, hairy leaves (eg flannel flowers) as rotting may occur. If fungal problems develop, any affected cuttings need to be removed from the frame and discarded. If the problem persists, the use of a fungicide spray may be unavoidable.
Root formation
Many cuttings will ‘strike’ (ie form roots) in 4-8 weeks in warm weather. Some species, however, may take much longer…up to 12 months or more in certain cases. If a cutting remains green and healthy it can be left in the frame for as long as needed (or until the propagator runs out of patience!).
Some plant species do, however, develop heavy callusing around the end of the cutting which either prevents root formation or only allows for week and fragile roots. Some grevilleas are in this category. If this occurs (and this can only be determined by removing the cuttings from the mix), the callus can be carefully trimmed back to healthy wood and the cuttings re-set in the mix.
After 4-8 weeks, root formation may be observed through the drainage holes in the pots. If no roots are visible through the drainage holes, root development may be checked by gently tapping out the soil mass from the pots.
 |
 |
|
| Left: Separating struck cuttings Right: Filling potting mix gently around the roots of the cutting |
||
Once roots have formed, separation of cuttings for potting on needs to be done carefully to minimize root damage. Of course, the possibility of damage is reduced if single cuttings had been placed initially in individual small tubes rather than community pots.
Hardening
This is a most essential step. Many struck cuttings are lost in the few weeks after removal from the propagating frame due to inadequate hardening. This can be carried out using a similar frame to that used to strike the cuttings. The hardening frame, however, is best kept closed during the daytime and propped open at night. After two weeks of this treatment, struck cuttings should be sufficiently hardened to be removed from the frame and placed in a shaded position for another two weeks. They can then be moved into the open.
Cuttings in community pots may not all form roots at the same time. In this situation, the soil mass should be gently broken up, struck cuttings transplanted into individual small pots for hardening and those without roots re-set and placed back into the propagating frame.
Growing-on and planting out
After 1-3 months, the hardened cuttings will be ready to transplant into larger (125 – 150 mm) pots. Plants will be ready for the garden when good root development has occurred. This can be checked by carefully tapping the plant out of the pot. The roots of the plants should not be allowed to become “pot-bound” (ie. develop into a tight, coiled mass). If this does occur, some root pruning will be needed before planting to ensure that the roots of the plants can easily spread into the surrounding soil. Certain groups of plants such as Boronia and Prostanthera are prone to become pot-bound fairly quickly.
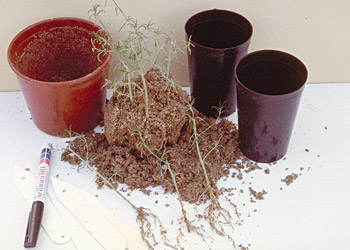
Division is a term loosely applied to a number of propagation methods where a plant is split into two or more pieces all of which have roots attached. “Division” means exactly what it says. At its most vigorous it means driving a spade through the centre of a clump, pulling one half of the plant out of the ground and planting it somewhere else in the garden. Provided adequate water is provided, it’s surprising how many plants will tolerate this sort of barbarism! Not surprisingly, though, a higher success rate can be achieved with a more gentle approach.
Division is most often used with plants which form grass-like clumps. Apart from the grasses themselves, these include Kangaroo Paws (Anigozanthos, Macropidia) and lilies (eg. Patersonia, Orthrosanthus). Other candidates for division are plants that sucker, those which naturally layer (ie. develop roots where their branches touch the ground) or those that produce aerial roots (eg. some orchids). Suckering plants include some species of Dampiera, Lechenaultia and Scaevola while those that self layer include species of Hibbertia, Viola and Isotoma.
Equipment
Nothing elaborate is required; secateurs (a spade or shovel for the bigger clumps!), a sharp knife, pots of various sizes, potting mix and, most importantly, somewhere to put the divisions while they develop a strong root system. This doesn’t need to be a dedicated greenhouse, a position sheltered from wind and direct sun will do for many species. Even better is a few pieces of wood nailed together to support a clear sheet of plastic …a sort of make-shift greenhouse. It might not look professional but the plants won’t mind!
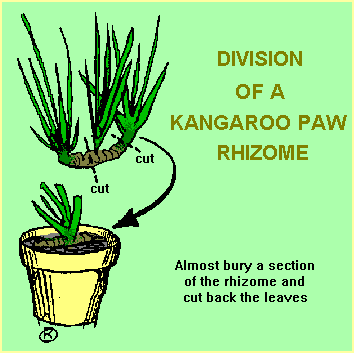 |
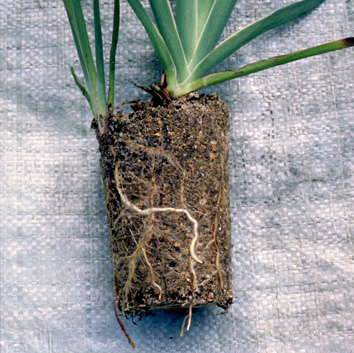 |
|
| Left: Dividing a Kangaroo Paw rhizome. Right: A new Kangaroo Paw plant successfully established | ||
Grass-like clumps
“Grassy clumps” generally have strap-like leaves arising from an underground rhizome which is a thickened underground stem. The best known Australian plants in this group are the Kangaroo Paws. Less well known are Dianella and Stypandra, both with spikes of small blue flowers, and Lomandra.
The technique involved in this group is quite simple. Once the clump is dug up (or tipped out of its pot), it’s divided into segments that comprise a piece of the rhizome, some leaf shoots and some roots. Dead leaves and dead roots should be removed. If you just want a few plants for your own use, the best sized division comprises three or four leaf shoots with a good section of rhizome and healthy roots. With these, the humid environment of a greenhouse or similar shelter is probably not required, just a sheltered position and regular watering.
If a humid greenhouse environment is available, the divisions can be quite small, comprising only one set of leaf shoots. Once potted into individual small pots, these are kept in the greenhouse for a few weeks (4 to 6 weeks in the warm part of the year; longer at other times). It may be beneficial to trim the leaves to reduce moisture loss through transpiration. Divisions of this size will also need to be “hardened” after the roots have developed. A simple method is to expose them to the open air during the night for a week or so, putting them back into the humid shelter during the day. After this period they can be moved to an outdoor, sheltered position for at least another week before potting on.
Plants that sucker
There are a host of plants which spread by producing suckers from their root systems. Some of these are so vigorous and invasive that propagation is probably the last thing on the gardener’s mind. Bamboo, for instance. Others, however, are less anti-social.
Among the Australian natives Dampiera and the related Lechenaultia often spread by suckering as do some lobelias and peperomias. Even seemingly unlikely genera such as Grevillea and Acacia have occasional suckering species.
All you need do with this group is to dig up small pieces (making sure that there are roots attached), pot them into individual containers and place them into a greenhouse or sheltered position for a few weeks.
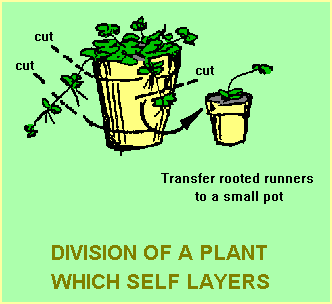
Layering species
Layering is a propagation technique (not used all that often these days) where a branch of a shrub is pegged down, covered with soil and then severed from the parent plant when roots have formed. There’s a bit more to it than that, of course, but in some cases, the plants do all of the work for us!
Most of these “self-layerers” are ground covers where branches are in contact with the ground due to the growth habit of the plants. Several Hibbertia species are in this category. H.pedunculata, for example, often forms roots at many points along its branches. The native violet (Viola banksii) is a similar example. Propagation is simply a matter of lifting a branch, cutting it into segments (each containing some roots), potting the segments to small pots and treating them in the same way described for the “grassy clumps”.
 |
 |
|
| Left: A keiki on Dendrobium kingianum. Right: Supporting a keiki in a pot of aged pine bark chips while the new plant is established Photos: Brian Walters |
||
Another group of plants which fall generally into the layering category are those that send out stolons (lateral, above ground stems which form roots at the leaf nodes). These usually form small plantlets where they touch the ground and these can be cut off and potted up. The well known exotic “Spider Plant” (Chlorophytum comosum) is a good example of this type of growth but many others (including some of the Australian Conostylis species) do much the same thing.
If you don’t have access to a greenhouse (or don’t feel inclined to construct a temporary structure) you can successfully propagate layering species in-situ. Just place a small pot of mix under the branch and place the roots into it. If necessary, peg the branch down with some wire to prevent the roots being pulled out of the mix by the wind. After a few weeks the roots should be well established in the mix and the new plant can be severed from its parent.
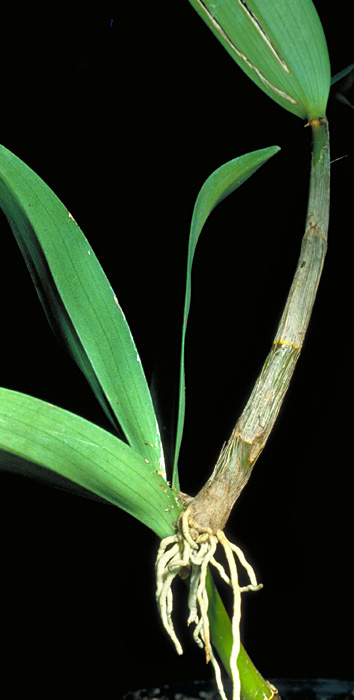
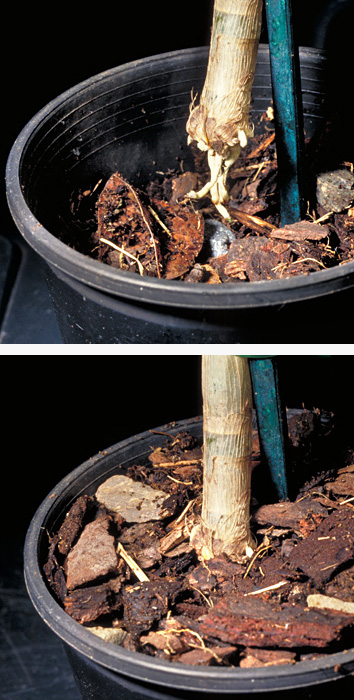
Plants that form aerial roots
A number of epiphytic orchids produce offset growths growing on the upper leaf nodes. These are commonly called “keikis” and gradually develop aerial roots. Onve the roots form the keikis can be simply detached and planted into a suitable mix (eg. aged pine bark chips) until the new plants become established.
When to divide
The best time for dividing plants is variable and depends on the climate. In warmer areas, virtually any time of year is suitable. Without doubt, though, the best time is in the warmer months. Divisions taken in late summer should develop strong roots well before the onset of winter. Divisions taken in the cooler part of the year will often show little sign of development until the weather warms up. In very cold districts, little success is likely unless some form of greenhouse is available.
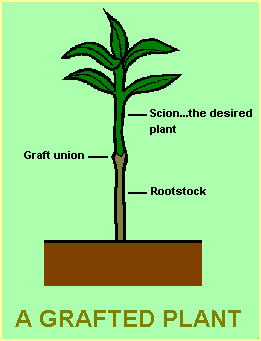
Grafting is not usually thought of as a method for the home gardener. However, the basic techniques involved are not difficult and are well within the scope of anyone who has mastered propagation by cuttings.
Grafting is normally used when propagating plants which are not hardy on their own roots or which do not reliably form roots with other propagating methods. It is a particularly useful method for extending the range of successful cultivation of difficult-to-grow species.
A graft consists of a top portion (the scion), which is the desired plant, growing on the roots of another plant (the stock). Grafting is a well developed practice in commercial horticulture and is used for propagation of most fruit trees and roses as well as being used with camellia and hibiscus in certain areas.
There are many different kinds of graft (not all of which are are related to horticulture!) but only the most common ones will be mentioned here. These are the Top Wedge Graft and the Approach Graft. Other methods are described in the listed references.
 |
 |
Grafting basics
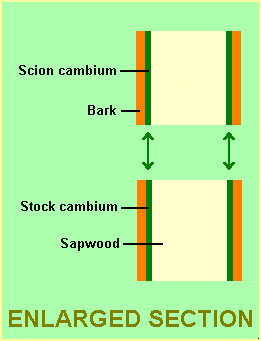
The basic principle in grafting is to ensure contact between the cambium of the scion and that of the stock. The cambium is the thin layer of actively dividing cells located between the bark and the sapwood.
The closer the relationship between the stock and the scion, the greater will be the chance of success. Plants of the same species will normally graft easily; different species of the same genus, a little less reliably; and different genera within the same family, a lesser chance again. Trying to graft plants from two different botanical families is unlikely to achieve much apart from improving your technique!
The materials needed are fairly simple…secateurs: a clean, sharp blade or knife; strips of teflon “plumber’s” tape for wrapping the graft union; and waterproof mastic or petroleum jelly to protect the union until the graft has taken. A “cold frame” to protect the newly grafted plants is also desirable but not absolutely essential.
Selection of material
By far the greatest amount of success with the grafting of Australian plants has been with the genera Grevillea, Hakea, Prostanthera (mint bushes) and Macadamia. In the latter case, selected forms of Macadamia tetraphylla and M.integrifolia are grafted onto seedlings of the same species. This enables robust plants to be produced which will fruit much more reliably than seedlings and at an earlier age.
Many grevilleas have been successfully grafted onto the common ‘Silky Oak’ (Grevillea robusta) but another good stock is the robust hybrid G. “Poorinda Royal Mantle”. Basically, any Grevillea which is hardy and robust in a particular district would be worth a try as a stock plant for the difficult to grow grevilleas.
Hakeas graft quite well onto the commonly grown species H. salicifolia and spectacular species such as H.francisiana and H.bucculenta are very reliable on this rootstock.
For those starting out in grafting a good confidence boosting graft to try is a mint bush, such as Prostanthera nivea, grafted onto the related Coast Rosemary (Westringia fruticosa) or the hybrid Westringia “Wynyabbie Gem”. Mint bushes are often short lived on their own roots but are very reliable as grafted species.
Other grafts that could be attempted include some of the Western Australian Banksias onto hardy eastern Australian species such as Banksia integrifolia or B.spinulosa. Banksias, however, are more difficult to graft successfully although some success has be demonstrated by experienced propagators.
Top wedge graft
This is probably the simplest and most convenient method for the beginner. For best results the stock and scion should be of the same stem diameter (this facilitates the matching up of cambium layers). The stock would need to be propagated by seed or cutting some months prior to the graft being made (unless a cutting graft is used, as described below). The stock is cut off about 50 -100 mm above the soil level leaving a few leaves on the stock until the graft has been successfully established. A simple slit about 5-15 mm long is then made in the centre of the stem.
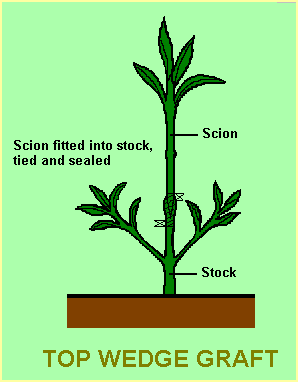
The scion is cut to a suitable length (say 75mm) and the lower end cut in the shape of a wedge of the same length as the slit in the stock. A very sharp blade will be needed to ensure that the cuts are clean. Leaves need to be removed from both the stock and the scion in the area to be joined so that the binding tape can be applied more easily. Handling of the freshly cut surfaces should be avoided as oil from the fingers may coat the freshly cut surfaces and hinder the successful union.
After the scion is inserted into the slit in the stock, the join needs to be tied firmly with the teflon tape, wrapping from the bottom up (this gives an overlap which sheds water). A coating of grafting mastic or petroleum jelly is applied over the tape to prevent water seeping into the grafted area. If the tape gives good coverage, the mastic need only be applied at the top and bottom of the taped area to give a good seal in those areas.
The grafted plant should be placed in a propagating “cold” frame until the scion shows new growth. At this stage the tape can be removed very carefully and the graft union inspected. If the join has callused well and the join looks to have taken well on both sides of the wedge, the tape can be left off but a coating of mastic or petroleum jelly over the join would be useful. The grafted plant should not be exposed to drying conditions for several more weeks.
If it can be obtained, pharmaceutical tape is preferable to the teflon tape as the former stretches as the graft union develops and eventually splits. This means that it is unnecessary to risk damaging a fragile union by untying the tape.
Sometimes it is not practical to arrange that stock and scion be the same diameter. If the scion is thinner, it needs to be set into the slit in the stock so that the cambium layers match on one side.
Top wedge cutting graft
This is carried out in exactly the same way as the top wedge graft except that in this case the stock has no roots and the graft is treated as a cutting. In this way both grafting and propagation of the stock are carried out at the same time.
This method is useful in cases where the stock is known to strike reliably from cuttings. In other cases it is quite possible to have a situation where the graft is successful but the stock refuses to form roots. This is enough to drive most propagators to the bottle!
Approach graft
The advantage of the approach graft is that it doesn’t require a cold frame for protection while the graft is developing. A shady position in the garden is usually sufficient.
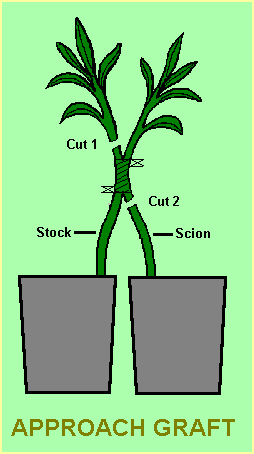
With this method both the stock and scion grow on their own roots until the graft has taken. The stems of the two plants are brought next to each other. Slices 25-30mm long (or more, depending on the sizes of the stems) and about 1/3 the thickness of each stem in depth are removed from each stem at a convenient height above soil level and at the same height above soil level on each stem. The two stems are then joined so that their cambium layers are touching on at least one side of the stems. The join is then tied with tape (as shown in the diagram) and covered with mastic or petroleum jelly at the join.
When the graft has taken, the top growth of the stock plant is cut back (Cut 1). Two to three weeks later or when the scion shows vigorous growth, the scion is severed from its roots to leave the scion growing solely on the rootstock (Cut 2).
This final cut can cause a shock to the plant and it is advisable to cover the scion with a clear plastic bag for a few days to maintain humidity. If the scion shows sign of wilting after the bag has been removed, it should be replaced for a further period.
Once the plant has acclimatised, the tape can be removed from the join.
How long does it take?
The time for a graft to “take” is variable but would rarely be less than six to eight weeks in warm weather. Often success will be indicated by a flush of new growth from the scion and a general thickening of the graft union. When checking the progress of a graft it’s necessary to untie the tape around the join very carefully – the union will be fragile even if successful.
With all successfully grafted plants, any shoots that occur from the stock below the join must be removed or the stock may grow away very vigorously and overwhelm the scion.
Further Information
Dawson, Ian (1996); Grafting Australian Native Plants. Proceedings of the IV National Workshop for Australian Native Flowers, 28-30 September 1996, University of Western Australia, Perth (includes comprehensive list of scion/stock combinations).
Several techniques are available that can improve the success rate of seed germination or of striking cuttings. They may also reduce the time taken to achieve germination or cutting strike. The most common techniques are heating and misting.
Heating
‘Bottom heating’ is a method used by most commercial propagating nurseries. This involves applying heat to the base of the propagating bed, usually by specially designed electrical cables or elements. The pots containing the cuttings or seeds are placed on the bed (usually sand or other inert material) and are heated by convection from below.
With cuttings, the aim of bottom heat is to maintain the base of the cuttings at a temperature of about 5-10 degrees C warmer than the top. This encourages root formation rather than foliage growth. With both cuttings and seedlings, the use of heating extends the period of active growth, enabling successful propagation to be carried out in the cooler parts of the year.
The main disadvantage of heating is its expense. Energy is not cheap and, unless the glasshouse or poly-house is well insulated, heat loss to the atmosphere can be considerable.
A second disadvantage, particularly for amateur growers, is the danger of the propagating mix drying out if watering is neglected.
Misting
Automatic misting is used to apply water to cuttings or seedlings on a controlled basis. It is often used in conjunction with a heating system and, once set up correctly, overcomes the problem of drying out of the propagating mix.
Misting involves the application of a fine spray of water to cuttings and seedlings at regular intervals based on a simple timer device or on a sensor which detects the drying out of leaf surfaces. A simple, commonly used sensor is a mechanical ‘leaf’ made of wire mesh which is supported on a pivot and connected to a mercury switch. Water falling on the mesh causes the leaf to swing down, breaking the electrical contact in the switch and causing an electric solenoid valve to close, shutting off the water. As the “leaf” dries, it swings up to re-establish the electrical contact and turning on the water supply again.
Once correctly set up, automatic misting systems can make the task of caring for seedlings and cuttings much simpler. For example, the plant propagation area can be left unattended for an extended period. A disadvantage, however, is that some plants react poorly to having the foliage continually wet and develop fungal diseases which can kill the seedlings and cuttings. This mainly effects those plants which have foliage with fine hairs (eg Flannel Flowers, Actinotus helianthi). These are best kept in a drier atmosphere.
Setting Up a Heating/Misting System
For the home propagator who produces only a small quantity of plants, the simplest method is to invest in one of the commercial, self-contained systems that can be obtained from larger nurseries. Typically, these are around 40-50 cm square and include a heating element in the base. Some of these also include a misting system.
A larger heating/misting system can be constructed to suit a particular size requirement using materials purchased from a horticultural supply company. However, given the potential for fatal electrical shock when water and electricity are used in close proximity, the services of a qualified electrical contractor would be necessary to ensure safety.
Most books dealing with Australian native plants will contain information on propagation methods and there are also a number of useful websites . Some of the most relevant references are listed below. In addition, back issues of the Society’s journal “Australian Plants” contain numerous articles on propagation of specific groups of plants.
Books:
- Blombery A (1977), Australian Native Plants, Angus and Robertson, Australia.
- Blombery A and Maloney B. (1984), Propagating Australian Plants, Kangaroo Press.
- Elliot W. R and Jones D (1980), The Encyclopaedia of Australian Plants, Vol.1, Lothian Publishing Company Pty Ltd, Melbourne.
- Hartmann H, Kester D, Davies F and Geneve R. (2002) Hartmann and Kester’s Plant Propagation: Principles and Practices, Prentice Hall, USA
- Ralph M (2003), Growing Australian Plants from Seed, Bushland Horticulture, Fitzroy, Victoria.
- Wrigley J and Fagg M (1996 – 4th ed), Australian Native Plants, Collins Publishers Australia.
Internet:
- ANPSA’s list of suppliers of Australian plant seed
- Epacrids from Cuttings – Propagating the Australian “heaths”
- Grafting Australian Native Plants by Iain Dawson from the Proceedings of the IV National Workshop for Australian Native Flowers, 28-30 September 1996, University of Western Australia, Perth
- How to Propagate Plants – Australian National Botanic Gardens
- Native Plant Seed Germination Database for Central Queensland – developed by Central Queensland University
- The Propagation of Banksia
- Review of the Promotive Effects of Smoke on Seed Dormancy
- Seed Germination Database of Tasmanian native species developed by the Royal Tasmanian Botanical Gardens.
- Smoke Germination of Australian Plants; T Vigilante et al. RIRDC; Publication no: 98-108
- Smoke Stimulates the Germination of Many Western Australian Plants